GS Mini Upgrade
About six months ago I bought the mini to use it during my stay in the states and try to fly it back home to Serbia. Back then I posted this review of the guitar. Being a DIY addict, I soon started making changes here and there to make it even better.
Nut and Saddle
I wanted to start with cheap, easy and reversible mods first, so I ordered a Tusq saddle (model “PQ-9200-C0”) and Tusq nut (model “PQ-6116-00”) that was suggested by Graphtech support as a direct replacement. I was prepared to do some sanding to fit the new saddle, but it was a perfect fit right off the bat. The height was also exactly the same as the factory saddle, so I just swapped the saddle and it was ready to go. I noticed that Tusq saddle looked a bit better with less mold lines than NuBone, and I was able to clean it with my nail. The nut required some sanding to fit perfectly, but not too much.
I also ordered a real bone saddle that I hoped could fit but it was a little bit shorter, making the action too low, so I couldn’t do head-to-head-to-head comparison with installed saddles. However, I tried few “scientific” tests with all three saddles to try to get a feel of their sonic properties. First I tried tapping the same object with each saddle and listen to the sound they make. Then I tried dropping each saddle on the desk from the same height and again listen to sound they make. In all test it was clear that Tusq is the brightest of all. I’ve never heard any material sound that bright, almost like crushing glass. Bone was the warmest and NuBone was somewhere in the middle.
As far as the real-world change it made, I think there is some increase in presence and detail in sound. Since mahogany is naturally warmer than spurce, I think it’s a nice change to add a bit of presence.
Tuners
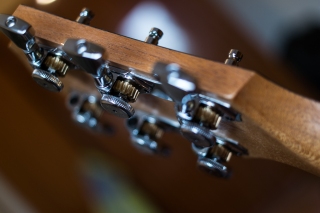
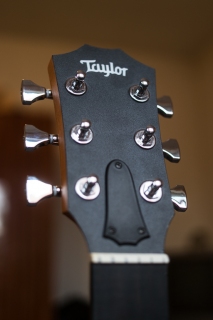
Stock Taylor tuners are decent, smooth are relatively stable, but I wanted a bit more precision and stability of locking tuners. I was looking for a set of tuners that fits the bill and also looks appropriate on acoustic guitar, as locking tuners are usually not associated with acoustic guitars. Hipshot Grip-Lock Open Gear tuners matched my requirements perfectly. They are well built, lock the string to the post and open gear construction goes really well visually with acoustic guitars. Besides that, they offer a simple, yet revolutionary UMP (Universal Mounting Plates) that make installation a breeze and don’t require any drilling in the headstock. Photo below shows how they look from player’s perspective. Classy and modern at the same time.
Default buttons look nice too, unique and fits the guitar well. Their shape matches the Taylor headstock nicely.
Bridge Slotting
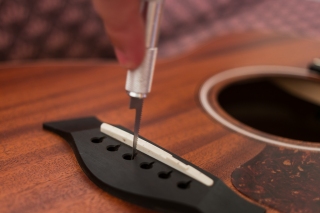
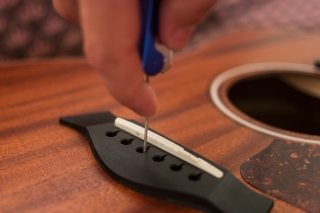
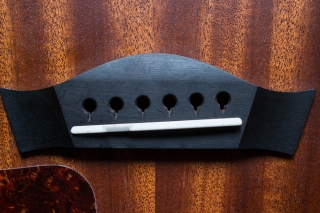
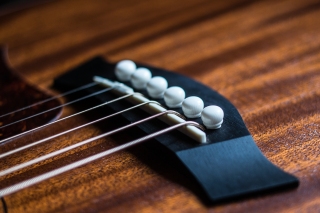
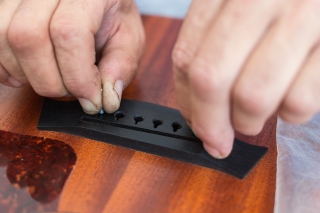
I noticed that standard slotted pins crack and deteriorate pretty fast and while looking for the solution I read about bridge slotting and positive impact it may have on the tone as well. The idea is to cut slots in each pin hole, wide and deep enough for string to fit. That implies two things: you can use plain unslotted pins which are much more durable. And that means that string now makes better contact with the bridge. You can even pull the pin out while string is under tension and it will stay in the slot. That improves energy transfer from strings to the top and increases volume and sustain. I also noticed slight increase in clarity, less compression.
This can be done easily using cheap tools from ebay. To initially cut the slot I used the specialized saw bought from eBay store GeetarGizmos. Then I used cheapo welding tip cleaner needle files to widen and shape the slots so they fit the string perfectly.
After about an hour of cutting and filing, the result was pretty neat. All holes match string gauges, so there’s no wiggle room.
New Bridge Pins
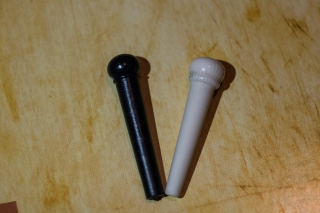
If you read my review, one of the things I hated about the looks are the cheapo bridge pins. I got StewMac Ivoroid pins which I liked visually, but do not match the specs of Taylor bridge pins exactly.
Shaft taper is different, pin head is slightly wider and shaft itself is slightly wider. Luckily, with some work they can be sanded down to fit the Taylor pin holes.
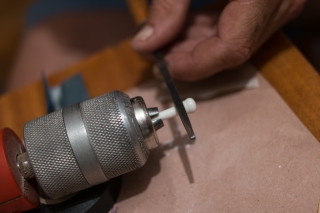
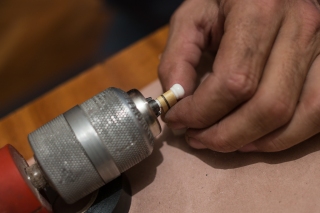
To speed up the process and make sure that sanding is applied evenly, we mounted each pin in the drill and then gradually file down and then sand down some extra material. It takes a couple of iterations for each pins because you don’t want to sand down too much and have pins fall out.
End result looks awesome, in my opinion. Ivory colored pins visually “open up” the guitar, as it was pretty dark around the bridge. And StewMac pins look very classy with those (simulated) ivory grain lines. Also, they are properly finished, so there are no molding lines that Taylor pins have.
JJB Prestige 330 Electronics
- Is not too expensive. I can’t justify a $150 investment on a $500 guitar.
- Sounds decent, without that annoying harsh piezo zing.
- Requires no routing or cutting.
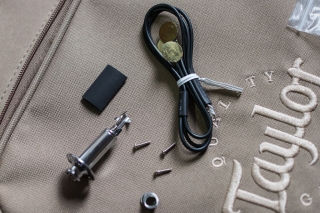
GS Mini is meant to be upgraded with electronics, so they left pinhole large enough to mount a jack pin assembly without drilling. JJB offers a version of the kit that includes drop-in jack pin replacement for Taylor pin which saves a lot of time and effort. Costing $50 and promising performance of K&K Pure Mini, I had to try it because it seems like a perfect candidate for me. For $50 bucks you get the pickups with leads long enough to fit any guitar I can think off, jack pin with mounting screws, a piece of heat shrink tubing to isolate connections on the jack and some solder. What you need is material for the jig, some super glue gel and soldering iron. Anything between 15 and 50 watts should do fine, there are only two leads to solder and they are pre-tinned making the job easy.
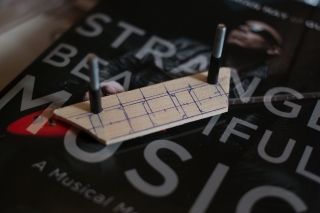
There are several different installation instructions floating around. I decided to go with the one that uses the bigger jig to glue all three pickups at the same time. We made the trapeze shaped jig out of soft wood marked all pins, drilled holes for the outer two pins and pulled screws through them that will serve as guidelines. To make sure they don’t wiggle inside the pin holes, we used electrician’s tape to make them fit snugly. Then I marked saddle position and drew rectangles where each pickup should sit.
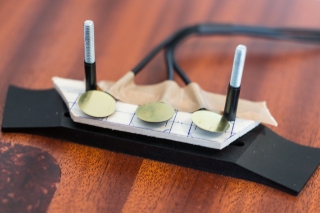
To temporarily fix the pickups to the jig we used paper sticky tape used for holding guitar binding in place. There are many ways this can be done, but it’s important not to glue them too strong because jig needs to be taken out after pickups are glued to the top. Use just enough to keep them in place, but not more than that. Also, super glue is though to remove. It’s important to protect the top of guitar against it. I used kitchen foil for that and put a piece of paper inside the body to protect the back of the guitar (which is not visible anyways).
I cleaned all metal surfaces on each pickup with naphtha and applied a generous amount of super glue gel on each of them. Gel is much more suitable here because it gives you precious 30-60 seconds to get the jig in the guitar, pull the screws out through the outer two pin holes and set it in place. Firm pressure is applied for few minutes just in case and than it’s safe to take the jig out.


What is the string post length for the locking tuners?
I don’t have the guitar anymore to verify, but I’m sure you can get that info from tuner manufacturer.
Greetings sir,
Just wanted to say thank you for sharing all this. I recently procured a GS mini and am likewise compelled to tinker with and improve wherever I can. I took your advice on both the hipshots (went with black) and the electronics which Im installing now thanks to your instruction. Went with black ebony pins and matching truss rod cover. Anyway, thanks again.
cool, let me know how it turns out.
Did you have to do some sanding on the Tusq nut?
Yes, but it’s very simple to do.
Can we see the whole guitar, can we hear it too?
Sure, I recently recorded a clip with it https://www.youtube.com/watch?v=CASlsDiU10I
and I think there’s a photo of the whole guitar under Reviews section.
Hey dude, looks great! Very professional, real clean!
One question for you, I install the very same pick up on my guitar, but for some reasons, the BBJ pickup are very, very weak in volume. I use a roland cube street amp, and the 330 sounds delicious when I switch the channel to “MIC” since it has more gain and power, but for the regular acoustic channel, it’s practically soundless.
On the other hand, I also own a Mini GS Koa, and its under-the-saddle transducer pickup is quite good, and it doesn’t share the same problem. I’m really hoping to find out if the problem is coming from BBJ 330 that I had installed on my spruce gs mini.
Do you share the same probelm with the BBJ 330 on your guitar, namely the low volume?
Hansel
Hi!
I don’t have any other electro-acoustic to compare, but it has enough volume to record straight into my audio interface, without a preamp. I built a small JFET preamp in a cable to serve as a buffer.
Cheers,
Bane
I installed a set of the JJB 330 transducers (15mm) in my GS Mini and another set in a Takamine dreadnought. The JJBs are virtual clones of the K&K Pure Western Mini pickups that I also use in some guitars. The transducers are plenty hot enough to drive any of my various amplifiers, including a Roland 40GX Cube, through the standard 1/4″ instrument input. I suspect a problem with your installation. Did you use cyanoacrylate gel glue (Superglue gel) and fully cover the gold side of the transducers with the gel before pressing them into place? Were the transducers placed directly below the saddle and staggered between the strings as shown in the instructions? Did you get good solder joints on the wiring and terminals when attaching the endpin jack? Did you connect the wires to the correct terminals (there are 3 terminals but you only use 2 of them)? Other than the freak occurrence of three faulty transducers, installation problems are the most likely. Attachment with two sided tape will greatly decrease the ability of the piezo materials to sense the vibrations because the compression of the crystals that must occur requires a solid seating of the transducers, so make sure to use the glue.
I bought a friend of mine a GS Mini with the ES-T under saddle transducer installed, like the one on your GS Mini Koa, and my GS Mini with the JJBs puts out about the same signal as his GS Mini with the ES-T pickup. Yes, we’ve played both the guitars through my Roland Cube using the standard 1/4″ instrument input jack. The Takamine is the same too.
Also, I installed ebony bridge pins from StewMac and used my electric drill as a mini lathe, just as the pictures above show. Works great. Just pay attention and avoid getting any of the drill chuck fingers down in the pin slot.
Thanks for posting. Looks great!